

Moonbeam is a smart contract platform in the Polkadot ecosystem that provides a seamless Ethereum-like environment. This compatibility is designed to make it easy to re-deploy existing Ethereum applications to Moonbeam (and thus, Polkadot) without significantly altering the codebase.
As an example of what an integration looks like, I have created a walkthrough of the process. Note that this deployment guide is for educational purposes only, to demonstrate how to deploy applications to Moonbeam. In this article, I will guide you through porting Uniswap V2 to the Moonbase Alpha TestNet. I’ll also explain the changes needed to have a fully-functional Uniswap V2 DEX with basic functionality on Moonbeam. If you prefer to skip ahead, you can check the Uniswap V2 version currently running on Moonbase AlphaGo to page https://moonbeam-swap.netlify.app/. There is also an ERC20 token faucet on Moonbase AlphaGo to page https://moonbase-minterc20.netlify.app/.
I’ve also written an explanatory article about what Uniswap is and how it worksGo to page https://moonbeam.network/education/what-is-uniswap/, if you are not already familiar.
Porting Uniswap V2 to Moonbase Alpha or a Moonbeam Standalone Node
Deploying Uniswap V2 Contracts to Moonbeam
A concrete example is better than 1000 words, so this section illustrates the process of deploying all the necessary Uniswap V2 contracts to Moonbeam.
To do so, a Github repoGo to page https://github.com/PureStake/moonbeam-uniswap was prepared. The “uniswap-contracts-moonbeam” folder includes Hardhat setup, which contains all the necessary contract files and a deployment script for the following contracts (essentials to run Uniswap):
- WETH: ether wrapped in an ERC20 token interface (in the interface it will be called wrapped DEV or WDEV)
- UniswapV2Factory: only input required is an address that can activate a protocol-level fee (input needed but not used in this example)
- UniswapV2Router02: requires the address of both the WETH and UniswapV2Factory contracts
- Multicall: aggregates results from multiple contract constant function calls, reducing the number of separate JSON RPC requests that need to be sent. This is required by the Uniswap interface
- Two ERC20 tokens: these are not required but were included to have some tokens to start to play around with
Getting started is just as easy as cloning the repo, installing the dependencies, and deploying the contracts with Hardhat. So first, let’s start cloning the repo and installing the dependencies:
In this folder, you will find a “hardhat-config.js” file that contains two pre-configured networks: a Moonbeam standalone node and the Moonbase Alpha TestNet. Here, make sure you modify `privateKey2` for the private key you want to use to deploy the contracts in the TestNet.
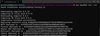
For this example, I’ll be deploying the contracts in a Moonbeam standalone node. You can spin up your own by following this tutorialGo to page https://docs.moonbeam.network/getting-started/local-node/setting-up-a-node/. With a fresh instance of a standalone node running, we can run our deployment script:
Note: To ensure that the Uniswap interface included in this repo works with a Moonbeam standalone node, you need to deploy the contracts against a fresh instance using the provided private key. The contracts will be deployed to specific addresses that are already configured in the interface and SDK.
Using only a simple Hardhat + Ethers.js script we’ve deployed all the necessary Uniswap V2 contracts to a Moonbeam standalone node. Note that, at first glance, no modifications were required at a contract level.
However, Uniswap uses an init_code hash that was changed in the UniswapV2Library contractGo to page https://github.com/Uniswap/v2-periphery/blob/master/contracts/libraries/UniswapV2Library.sol. Remember the create2 opcode? Well the change is related to it. This init_code hash is used to calculate the address of a pool (created by the opcode) by providing only the addresses of the two ERC20 tokens. The address can be calculated with the following formula:
address = keccak256(0xff + factoryAddress + salt + keccak256(UniswapV2Pair.bytecode))
Where the salt is the same as the one shown in the UniswapV2Factory code (related to both token addresses). The init_code hash is the last bit of the equation (keccak256(UniswapV2Pair.bytecode)), that is the keccak256 hash of the bytecode of the UniswapV2Pair contract. If the wrong init_code is provided, the smart contracts (and interface) won’t be able to calculate the correct address of the pool. The ini_code can be obtained in different ways. For example, fetching the bytecode manually in Remix and calculating the keccak 256 hash.
The code that was changed lies inside the pairFor function of the UniswapV2Library contract:
Nevertheless, this modification is not related to deploying the contract on Moonbeam rather than Ethereum, but it is a consequence of the create2 opcode.
Adapting Uniswap V2 Interface to Support Moonbeam
The Uniswap V2 Interface is used as a middleware between the smart contracts and the user. The interface relies on external providers (such as MetaMask) and the ethers.jsGo to page https://docs.ethers.org/v6/ library to connect and interact with the blockchain, respectively.
Deploying the smart contracts to Moonbeam (in this case, a standalone node) was a pretty straightforward task, as it provides a full Ethereum-like environment. Adapting the interface so that it works with our deployment was somewhat more complicated. This is because the interface has two main factors which limit its implementation into a new blockchain: the network chain ID, and the addresses of the deployed contracts. Moreover, the Uniswap SDK (a package the interface depends on) needs to be modified as well for the same reasons (next section).
The modified interface is included in this Github repoGo to page https://github.com/papermoonio/moonbeam-uniswap, inside the “uniswap-interface-moonbeam” folder. Getting started is quite simple: clone the repo, install the dependencies and run the interface instance.
Note that the interface (and SDK) have some contract addresses hardcoded. If you are using a fresh standalone node, and deploy the contracts with the Hardhat configuration provided, it should work. However, if you deploy the contracts to the TestNet, you would need to modify the addresses in both the interface and SDK.
The following sections dive into a more detailed breakdown of the actual changes that took place.
Including the Chain ID
The chain ID was introduced in EIP-155Go to page https://github.com/ethereum/EIPs/blob/master/EIPS/eip-155.md. It originated to prevent replay-attacks between ETH and ETC chains that shared the same network ID. The chain ID argument is included in the transaction signature so that two identical transactions will have different v-r-s signature values. Some chain ID values include:
The Uniswap V2 Interface has baked-in some predefined chain IDs so that, once the interface is connected to a blockchain via a provider, it checks that the protocol supports the network you are connecting to.
Both Moonbeam related Chain IDs were added to the following files (inside the “uniswap-interface-moonbeam” folder) :
- ./src/connectors/index.ts: add the corresponding chain IDs inside the “supportedChainIds” array:
- ./src/components/Header/index.tsx: add the chain IDs and network labels following the corresponding format inside “NETWORK_LABELS”:
- ./src/constants/index.ts: add the chain IDs following the corresponding format inside “WDEV_ONLY: ChainTokenList”:
- ./src/state/lists/hooks.ts: add the chain IDs following the corresponding format inside “EMPTY_LIST: TokenAddressMap”:
In the previous code snippets, the ChainId.* object is imported from the SDK.
Adding the New Contract Addresses
As you would expect, the Uniswap interface is configured to work with the addresses of the contracts deployed to Ethereum. Therefore, the new addresses need to be specified.
The goal was for the interface to work with both a fresh Moonbeam standalone node and the Moonbase Alpha TestNet. Therefore, some modifications were made so that the address was dependent on the network’s chain ID to which the provider is connected. The files that were modified (inside the “uniswap-interface-moonbeam” folder) are listed below. Note that each file imports a `moonbase_address.json` file that is located in the `./src` folder, which contains the addresses of the deployment in Moonbase Alpha.
- ./src/constants/index.ts: add the corresponding router address. The routerv2 variable is imported
- ./src/constants/multicall/index.tsx: add the corresponding multicall address
- ./src/state/swap/hooks.ts: add the corresponding factory and router addresses inside “BAD_RECIPIENT_ADDRESS”. For testing purposes, this parameter is not required
Other Changes
Everything related to Uniswap V1 was removed from the files, as no V1 deployment was used in this example.
Other changes also include:
Logo: file in ./src/assets/images/mainlogo.png
Links: file in ./src/components/Menu/index.tsx
Adapting Uniswap SDK to Support Moonbeam
The SDK contains additional information that is used by the interface as an NPM package. The modified SDK is included in this Github repoGo to page https://github.com/papermoonio/moonbeam-uniswap, inside the “uniswap-sdk-moonbeam” folder.
The SDK folder provided works out of the box with the Moonbeam standalone contract deployment done via the Hardhat configuration previously described. It also contains the addresses of the contracts deployed to the Moonbase Alpha TestNet. This is all packed and published as an NPM package with the name “moonbeamswap.”
Before building the NPM package, the files listed below need to be modified (inside the “uniswap-sdk-moonbeam” folder). Note that each file imports a `moonbase_address.json` file that is located in the `./src` folder and contains the addresses of the deployment in Moonbase Alpha:
- ./src/constants.ts: add the corresponding chain IDs inside the “ChainId” enum, change the factory address, and modify the init_code hash
- ./src/entities/token.ts: add the WETH (WDEV in this case) token contract address:
- ./src/entities/token.ts: add the WETH (WDEV in this case) token contract address:
Once all the files have been modified, change package name, version and description inside the `package.json` file. When you are ready, log in into your npm account run the publish command:
If you are going to run your custom package in the interface, make sure to add it as a dependency in the `package.json` file of the interface folder.
Learn More About Moonbeam
If you are interested in MoonbeamGo to page https://moonbeam.network/networks/moonbeam/ and want to learn more, subscribe to our newsletterGo to page https://moonbeam.network/newsletter/ and follow us on social (links in the page header).