

This is an updated version of the tutorial that was originally published on March 17, 2022.
PolkassemblyGo to page https://moonriver.polkassembly.io/gov-2 is an open-source platform for anyone to discover and participate in Moonbeam’s on-chain governance. Polkassembly fully supports OpenGov, also known as Gov2,Go to page https://docs.moonbeam.network/tokens/governance/voting/opengov-voting/ now live on all Moonbeam networks.
Polkassembly makes it easy to participate in governance. You can open and interact with discussion posts to engage with other community members around different topics. You can also browse on-chain proposals, referenda, and treasury requests (among others), discuss them with the community, and vote directly from the website. You can also check Council members and motions, Technical Committee proposals, and more through a user-friendly interface. If you want to participate in on-chain governance, such as commenting on discussions or voting on a proposal, signing up for an account is required.
Refer to the documentation website for an overview of Moonbeam’s governance features.Go to page https://docs.moonbeam.network/learn/features/governance/
Sign up for a Polkassembly Account
There are two ways you can sign up for a Polkassembly account: using a username and password or with your wallet. Polkassembly supports multiple wallets, including Talisman and MetaMask (thereby supporting Ledger and Trezor as well). If you sign up using a username and password, you’ll be able to connect your wallet later to perform actions such as voting on a proposal.
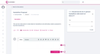
To sign up with a username, you can take the following steps:
1. Click Login in the top right corner.
2. Click Sign Up.
3. Enter a username.
4. Enter your email address.
5. Click Next.
6. Create a password.
7. Re-enter that password.
8. If you agree to the Polkassembly end user agreement, go ahead and click Sign Up.
To sign up with your wallet, you can get started by clicking on Sign-up with Web3 address. You’ll then be prompted to select your wallet from the list of wallets. For this example, MetaMask will be selected. MetaMask will pop-up and then you can choose the account you want to connect with and click on Connect.
On Polkassembly, you can take the following steps to finish signing up with your wallet:
1. Select your preferred wallet. In this case we’ll choose MetaMask.
2. Confirm your address in the Choose linked account dropdown.
3. If you agree to the Polkassembly end user agreement, go ahead and click on Sign-up.
4. Your EVM wallet will pop-up again, and you’ll be prompted to sign a message. Click on Sign.

Once you’ve signed the message, your account will be created, and you’ll automatically be logged in. Your wallet address should appear in the top right corner, if not you can follow the instructions in the next section to log in.
Please note that you can add an email address that can be used to recover your account from the Settings menu at any time.
Login to Polkassembly
If you’ve already signed up for an account, you can login using the same method you signed up with.
To login using a username and password, you can follow these steps:
1. Click on Login at the top right corner.
2. Enter your username.
3. Enter your password.
4. Click Login.

To log in using your wallet, click on Login with Web3 address. You’ll then be prompted to select your wallet from the list of wallets. This example uses MetaMask. MetaMask will pop up, and you’ll choose the account you signed up with.
On Polkassembly, you can take the following steps to finish logging in:
1. Select your preferred wallet. In this case we’ll choose MetaMask.
2. Choose your Web3 address from the Choose linked account dropdown.
3. Click on Login.
4. Your EVM wallet will pop up and you’ll be prompted to sign a message.
Once you’ve signed the message, you’ll be logged in, and your wallet address should appear in the top right corner.
How to Participate in Discussions
Once signed in, you’ll be able to actively participate in any of the existing discussions or create your own. To view the latest discussions, navigate to the Discussions tab in the left hand menu. You can click on any of the discussions in the list to read the description and comments, comment on the post, subscribe to notifications, share the post on Twitter, and more. Some discussions will include polls that you can vote on.
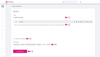
To create your own discussion, return to the Discussions tab’s main page and select New post. From there, you can:
1. Add a title for your discussion post.
2. Enter a description.
3. Optionally, you can include a poll to gain further insight into what others think about your post. The length of the poll is defaulted to two weeks, after which it will be closed and can no longer be voted on.
4. Choose a category that best fits your post.
5. Click on Create Post.
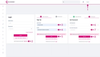
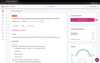
The discussion will be created instantly. If you added a poll, you’ll see two sections: Poll Signals and Council Signals. The Poll Signals section displays a general overview of the poll and current votes, and the Council Signals show which current council members, if any, have voted and what their vote is. Council votes are also included in the Poll Signals section.
You can also create additional polls where you customize the specific question, answer options, and length of the poll.
Polls are voted on off-chain, so to vote, you don’t need to have your wallet connected. If you voted in a poll, you can change your vote at any time.
To add a comment to an existing discussion, click on the discussion, and then you can simply take the following steps:
1. Scroll down to the text box and add your comment.
2. Click on Comment.
How to Vote on a Proposal
There are three main referendum states that concern voting token holders. The first is the Lead-in / Prepare period. A proposal will become first visible on Polkassembly marked as Submitted at its Lead-in / Prepare period, at which point voting is enabled, but the votes do not count toward the outcome of the referendum yet. The next state is the Deciding Period, which is the primary voting period where the referendum will spend the bulk of its time. If a referendum does not pass by the end of this period, it is rejected. Finally, there is the Confirm Period, a shorter window of time within the Deciding Period, during which the referendum must continuously pass in order to be approved. More details about each of these states can be found on the Moonbeam docs site.Go to page https://docs.moonbeam.network/learn/features/governance/
Token holders can vote on referenda in any of the three aforementioned states. With OpenGov, there can now be multiple “in flight” referenda rather than a single referendum open for voting at a time. Note that in OpenGov, there is no notion of seconding or endorsing a proposal like there was in Governance v1.
You can vote with either your free balance or with staked tokens. Two factors account for the vote weight: the amount locked and the locking period. When voting on a referendum, you’ll be able to explicitly provide the balance to lock and the locking period for your vote. Once the locking period has expired, you can unlock the tokens through Polkassembly as well, but this is covered in the next section.
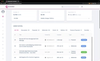
You can see a list of referenda under the Latest Activity section on the homepage, or you can use the sidebar to select from the various options underneath Tracks. OpenGov introduces the notion of Tracks to categorize referenda based on their impact and adjust governance parameters accordingly. Proposals that utilize less privileged tracks like General Admin are designed to be easier to pass (even concurrently with others), whereas Root origin tracks face the most scrutiny and the strictest approval parameters.
Each referendum will have a label attached to it, which can be any of the following:
- Submitted – the referendum has been submitted and is up for voting.
- Deciding – the referendum is in the Deciding Period and is up for voting.
- Confirming – the referendum is in the Confirm Period and is up for voting.
- Confirmed – the referendum has successfully passed, but hasn’t been executed yet.
- Executed – the referendum passed and has been executed.
- TimedOut – the referendum failed and there is no time left in the Deciding Period.
For more information about the “happy path” of a referendum in OpenGov, be sure to check out the Governance section of the Moonbeam docs site.Go to page https://docs.moonbeam.network/learn/features/governance/
If you try to vote on a referendum and haven’t connected your EVM wallet yet, Polkassembly should prompt you to connect an account. On the referendum page, you’ll be able to read a description of the proposal as provided by the proposer, in addition to on-chain information and the timeline for the proposal.
To vote on a referendum, ensure that you’re logged in and that the account that you’d like to vote with is connected to Polkassembly. Then, verify the referendum has the Submitted, Deciding, or Confirming label and Press Cast Vote Now.
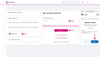
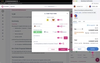
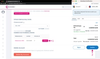
To complete the voting process, take the following steps:
1. Click on your desired EVM wallet. The Vote with Account field will populate based on your connected account, and your available balance will be displayed.
2. Enter the amount you’re willing to lock for the vote in the Lock balance field. Don’t input your entire account balance as you’ll need to have some funds remaining for gas.
3. Verify you’re using the correct account from the Vote with account dropdown.
4. Choose how long you want to lock your tokens for from the Vote lock dropdown.
5. Click on Aye or Nay, depending on whether you agree with the referendum or not.
6. Review your choices then press Confirm.
7. Confirm the transaction in your EVM wallet.
When the transaction is complete, the Turnout amount and the Aye or Nay amount will be updated on the right side panel.
How to Unlock Democracy Locks
Once your chosen voting lock period has expired, you can unlock your locked tokens. Unlocking democracy locks is a two-step process. First, you have to remove any votes, and then you can unlock your tokens. This process can be completed from the settings page.
To navigate to the settings page, click on either your username or your wallet address in the upper left corner. From the dropdown, select Settings.
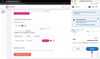
Once on the settings page, scroll down towards the bottom of the page until you see the Unlock democracy locks section, and take the following steps to remove a lock:
1. Verify the correct account is selected from the Choose account dropdown. If it’s not the correct account, you can switch accounts in your EVM wallet and refresh the page.
2. Choose the proposal you want to remove the lock for and click Remove.
3. Your EVM wallet will pop up, and you can confirm the transaction.
To finalize the unlock and return the locked tokens to your free balance, you can:
1. Click on the Unlock button.
2. Your EVM wallet will pop up, and you can confirm the transaction.
Once the transaction goes through, you’ll notice that the Unlock democracy locks section has been updated and the lock no longer exists. You can check that your balance has changed by searching for your address on Moonbeam’s SubscanGo to page https://moonbeam.subscan.io/ and expanding your GLMR balance, which will show you your transferrable balance, staked balance, democracy balance, and more.