Most decentralized apps live on a single chain and are only aware of a single ecosystem that they’re deployed on. Some of the largest dApps deploy the same contracts on different chains, but their smart contracts have no chain interoperability: each smart contract is still contained in their network of choice.
The future of smart contract interoperability is expanding on Moonbeam’s ecosystem via connected contracts, which allow data and liquidity to seamlessly cross between networks. Take a look at an example multichain-aware dApp that combines conventional Web3 frontend tools like useDApp and Next.js with Axelar’s General Message Passing (a cross-chain message passing) protocol. dApps like this are deployed on Moonbeam, with more coming soon.
A new trend is emerging that allows these multichain-aware smart contracts to tap into logic & functionality from Polkadot, Ethereum, Avalanche, Cosmos, and beyond. Even the dApp giant SushiSwap has started making use of the technology by creating its cross-chain AMM, SushiXSwap. In the future, connected contracts will enable further chain-agonistic swaps, marketplaces, and lending protocols at a scale greater than ever before.
When smart contracts change, frontends will too.
Intro to Axelar Contracts
Before introducing the design of the frontend, you should understand from at least a surface level how connected contracts work. Moonbeam provides multiple solutions for connected contracts, like LayerZero, and more are coming. In this blog post’s example dApp, Axelar is being used as the connected contract solution, but even if you don’t aim to use Axelar, there are design ideas presented in this post that might still be of use to think about.
Axelar is a blockchain that connects blockchains, delivering secure cross-chain communication. Every validator in Axelar’s network runs light nodes on chains that Axelar supports. This dynamic validator set achieves consensus to confirm that messages are being sent from one chain to another by monitoring each chain’s Axelar gateway contract, which is one of the two Axelar contracts that the example contract interacts with.

Image from Axelar Network
The other contract is the Axelar Gas Receiver microservice. Whenever a dApp uses an Axelar Gateway to send a cross-chain transaction, IAxelarGasReceiver lets the user pay for the subsequent transaction on the destination chain. It allows the end user to only send one transaction to automatically update the destination chain and to pay all transaction fees in the source-chain token they already hold.
Multichain Design Strategy
The plan is to design a frontend that can send data from one EVM chain’s connected contract (like Moonbeam) to another EVM chain’s connected contract (like Ethereum).
You might already be acquainted with how typical dApps work:
- The user decides to connect to the dApp with their wallet.
- The frontend presents a transaction that a user may want to confirm.
- The user will use MetaMask or some other wallet to sign and send the transaction.
- The transaction will be sent to a node, and the frontend will monitor it for success.
- Frontend updates once success is confirmed.
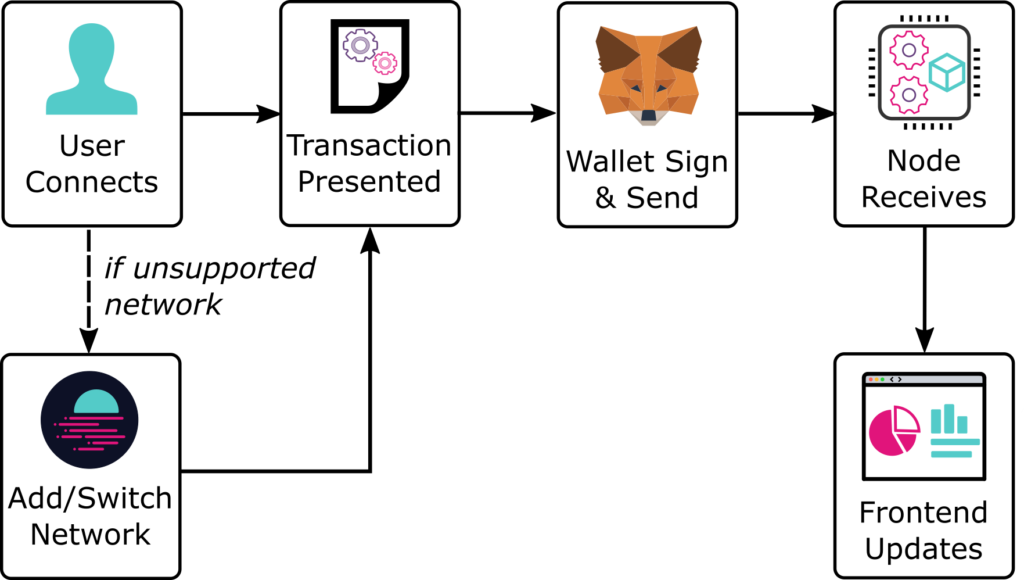
The example frontend will not be much different from this, except since it’s multichain there are more options to manage at every step! Users can connect to multiple chains, so there are multiple contracts to make transactions with. Since there are multiple chains with multiple contracts, you have to display data from each chain & contract. And most complex of all, depending on which connected contract solution is being used, there are up to three different networks that you have to monitor to confirm that a transaction was successful!
For most of these issues, an array of Ethers.js objects could work. As long as a dApp can read from a contract on one chain, it can read from a contract on another chain, as well. The more difficult issue is in monitoring cross-chain transactions.
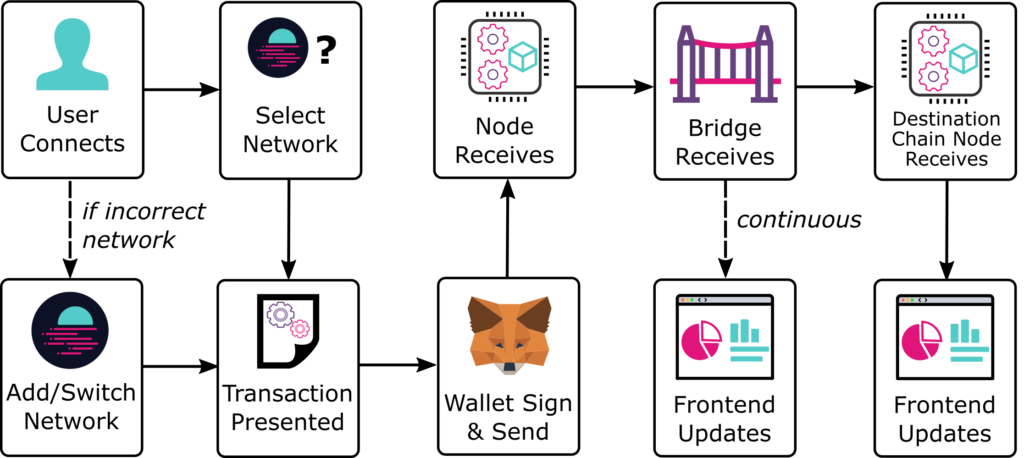
First, the user has to sign and send a transaction to a cross-connected smart contract on an origin chain. Since this example is using Axelar as the cross-chain mediator, this cross-connected smart contract will alert Axelar’s gateway contract on the origin chain of a new pending cross-chain message. Second, the Axelar Network will pick up on this message and approve it in a decentralized manner. Third, once the cross-chain message is approved, the Axelar network will try to update the destination chain with the data from the cross-chain message.
That’s three networks: the origin chain, the Axelar network, and the destination chain. How do you keep track of it all?
Well, if you’re an experienced dApp developer, there are some tools in your belt that you can probably take advantage of without introducing anything new. Packages like Ethers.js that can interact with the Ethereum JSON RPC can already monitor transactions on chains that support the EVM, like the origin and destination chains.
Additionally, the Axelar SDK allows developers to track and recover transactions that get sent to the Axelar chain. While querying with the SDK doesn’t provide information about the transactions until the origin chain has been included in the origin chain block, it does let you know details about the Axelar and destination chain transactions.
There are a few ways that you could combine these tools to query the data that you need. This example implementation opted to:
- Use Ethers.js to monitor the origin chain transaction until it’s mined.
- Use the Axelar SDK to repeatedly query the status of the message on the Axelar network & destination chain.
The Frontend
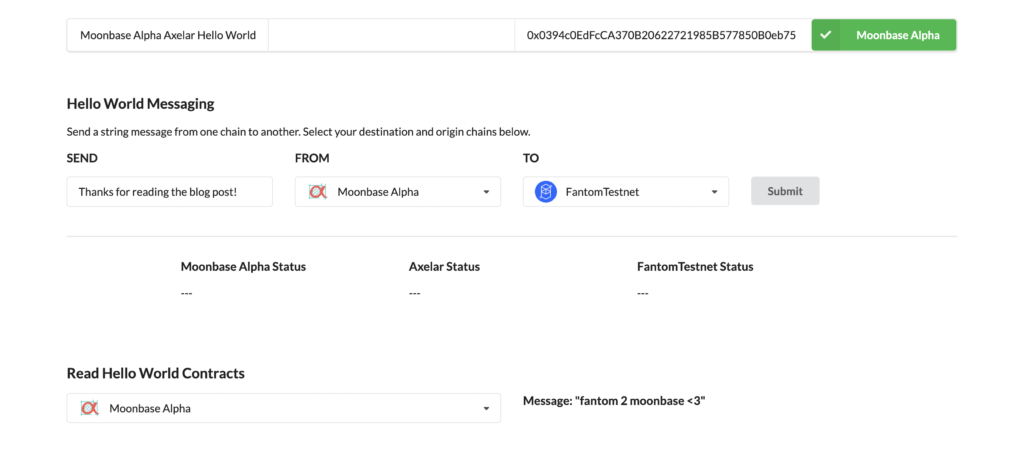
You can try out a simple frontend to show off a plausible implementation of a cross-chain dApp (it looks like the screenshot below). The contract that it interacts with simply sends a short string from chain to chain, and is very similar to the smart contract used in the first Axelar blog post. For example, I sent the phrase “fantom 2 moonbase <3” from Moonbase Alpha (Moonbeam’s testnet) to Fantom’s testnet.
The frontend was built with TypeScript Next.js (React) as a framework due to React’s popularity and broad support. useDApp was the package of choice to interact with the EVM since it was built off of the popular Ethers.js package, was built specifically for React frontends, and had multichain support. Finally and less importantly, it used Semantic UI’s components and theme library for simplicity.
React is a very popular framework, but there are plenty of other frameworks out there, and you are encouraged to explore. The same goes for useDApp and Semantic UI: there are other packages that can do similar things, and you can use them if you feel more comfortable with them. This blog will mention the big ideas to look out for in your implementation but will still stick to showing you the specifics of the implementation on hand in case you want to take… inspiration from the code.
Now take a look at the sample frontend. This post isn’t going to go over everything, and it’ll assume that you know how React & general web development works, but it will go over parts that may be unfamiliar to developers used to working with certain packages. It’s best to view the implementations in greater detail with the GitHub repository, so you are encouraged to open it up.
Switching Between Chains
The ability to switch between chains is arguably the most important feature in a multichain dApp. Most frontend libraries that allow you to connect with a wallet will allow you to do this in one way or another, but this post will show how to use it in useDApp.
If you’ve never used useDApp, then you’ll need to know that it requires a context provider with a config to work. This provider is located within the _app.tsx file. The config allows you to easily define which networks are accepted and which aren’t. In the example below, Moonbase Alpha and a couple of other testnet chains are configured.

You can now prompt the user to change their network if they’re on the wrong one or if they indicate in your dApp that they want to change it with the switchNetwork function provided by the useEthers hook. Note that useEthers can provide a lot of information, including the current connected account address and the user’s selected network.
![]()
So in the dApp, whenever someone wants to change the origin chain, the frontend automatically prompts them to change their wallet network. This is super handy for multichain dApps that can have the user switch between networks often. Keep in mind that this only works for MetaMask.

Regardless of whether or not you opt to implement useDApp in one of your personal projects, you will want to keep track of the chain ID that your user is connected with and organize your dictionaries of objects based on that number.
Reading from Multiple Contracts
Reading from multiple contracts is also simple with useDApp. The contract that the frontend will be interacting with, HelloWorldMessage.sol, is located within the ethereum folder of the GitHub repository. All it’s doing is reading from a mapping (address to string) since, in this contract, every user has their own message.

Here’s how the project reads the data from the connected contracts:
- Declare a state variable that represents the network with the contract you want to read.
- Construct a contract object from Ethers.js that represents the connected contract you want to read from.
- Get a data object using a custom hook: useCall.
useCall is provided by useDApp. It allows you to read data from a contract in a way that’s easier than using just Ethers.js. It’s provided with a contract object (of the connected contract), a method (lastMessage), and an argument (the user’s address).
Also note that useCall has a second optional input object, with a chainId element. useDApp has multichain support built in, which allows the developer to easily decide which network they want to read from, which is exactly what’s needed in this situation.
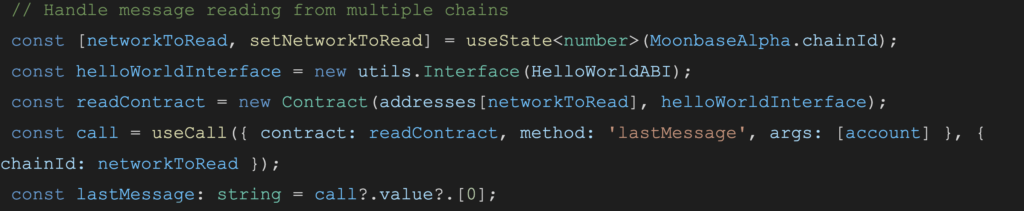
If you’re working without useDApp, you could use the useEffect hook to detect when the networkToRead variable changes, and then use whichever library you wish to query the relevant data.
Submitting the Transaction
Before looking at the message that’s sent to and from Moonbase Alpha, take a look at the contract so that you know what the dApp is sending.
sendMessage will send an encoded string and address message across chains via Axelar with the option to pay for its gas on the destination chain. Note that in order to pay this gas, you’ll have to send native currency with the transaction, hence why the function is payable.
The parameters include the message itself, the address of the connected contract on the destination chain, and the name of the destination chain (Axelar expects the name of the mainnet chain even when on the testnet, for example, Moonbeam instead of Moonbase).
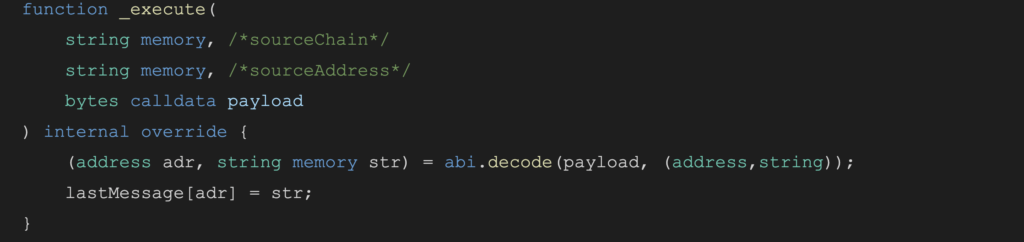
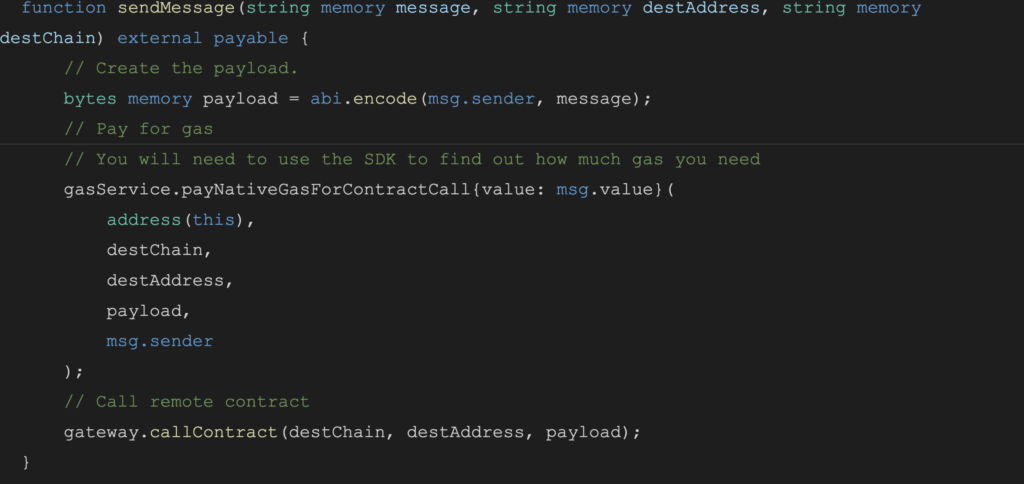 Axelar will call the _execute function on the destination chain’s contract so that it receives the message. The contract will decode the message and store it in the map that’s used to retrieve messages:
If you would like to learn how to deploy this contract and use your own contract instead of the ones provided in the GitHub repository, follow the Axelar hello world blog post, which introduces how to use Axelar on Moonbeam. Just be sure to use the updated contract in this frontend repository instead of the one provided in the previous blog post.
The code to send this transaction is, unfortunately, a little complicated to follow. The most important thing to look at right now is the useAxelarFunction hook, the Axelar SDK section, and the use of send.
The useAxelarFunction hook is a custom hook that was written to help with the fact that there is a chain of transactions on multiple networks. You will take a closer look at it later, but for now, assume that the send function that’s exported from it is the same as the send function that’s exported from the useDApp useContractFunction hook.
The useContractFunction hook is used to interact with contract functions that mutate state. For the dApp’s purposes, it monitors the state of the transaction and provides the send function to prompt the user to sign and send the transaction with their wallet. It also provides an object for events, but that is unused in this scenario.

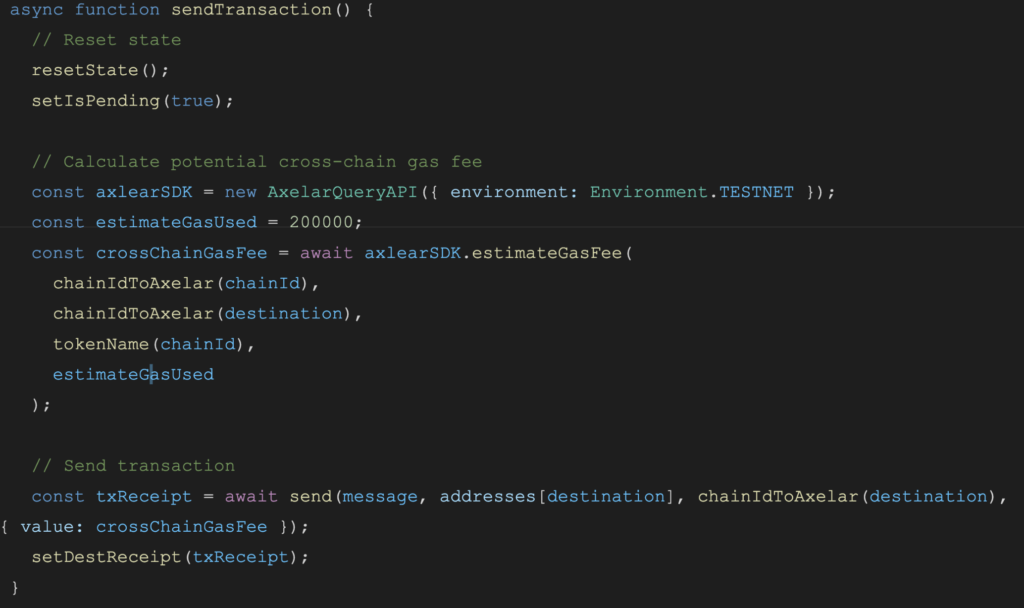
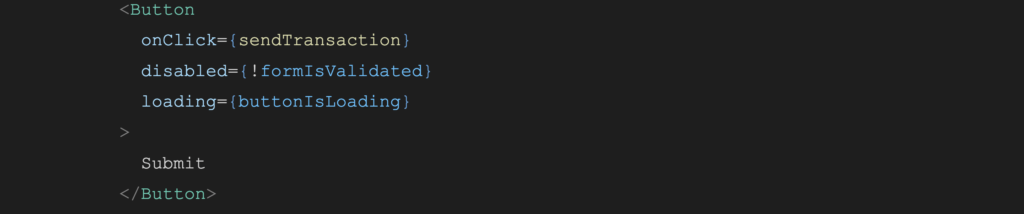
Take a deeper look at how the send function is used in the sendTransaction function, which fires upon a button press in the UI. At the very bottom of the code snippet below, the code sends a transaction. It passes in all of the parameters that the sendMessage function requires, as well as an additional object that includes a value element to specify an amount of native currency to pay the AxelarGasServices contract. But how do you know how much native currency to send?
If you look at the code above the send function, you’ll notice that the Axelar SDK is being used. The amount of gas to spend on the destination chain must be estimated because it is difficult to estimate a function that can only be called by a specific contract. In this case, it’s overestimating the amount of gas that will spent as 200,000. In an actual production environment, you may want to benchmark the amount of gas that you spend. However, if you do end up overestimating by a lot, you will get refunded by Axelar’s gas services.
The estimateGasFee function provided by the Axelar SDK’s AxelarQueryAPI will find the conversion between the origin chain’s native currency and the destination chain’s native currency to find the right amount to send to the destination chain. This value ends up being included in the Axelar SDK function.
 Finally, as was mentioned before, this function is set to fire when the submit button is pressed.
Monitoring a Transaction
Now comes the most complex part: monitoring the transaction between multiple chains. The project must implement what was discussed during the design strategy.
Not every connected contracts solution on Moonbeam has monitoring tools: for some, you will only know the status of the transaction at the end, when it succeeds or fails. If you decide to use a solution without a monitoring solution, you may have to simply query the destination chain’s state until it changes. Axelar, on the other hand, has many states and a more robust monitoring system included in its SDK.
Calling an Axelar-connected function will likely happen again in another React-based project, hence why the custom React hook useAxelarFunction now exists. It lives in the axelar folder within the ethereum folder of the project, under the file name useAxelarFunction.ts.

The hook is meant to extend the useContractFunction hook. It combines the multiple states from multiple sources (all three chains) into one state enum while still optionally providing all information queried.
This blog post has cut out a lot of the boring state updating code to focus on the important bits, which are shown in the code snippets below. The following snippet appears at the very top of the script’s file.
The useContractFunction hook is used, which makes sense since its functionality is being extended. There are also two state variables, one of which tracks the state of all three transactions through an enum (named AxelarTransactionState, it’s not included in an SDK), and another which holds the general message response object that the SDK tracking provides. The useContractFunction state has been renamed to originState since the new state will track all three transactions.

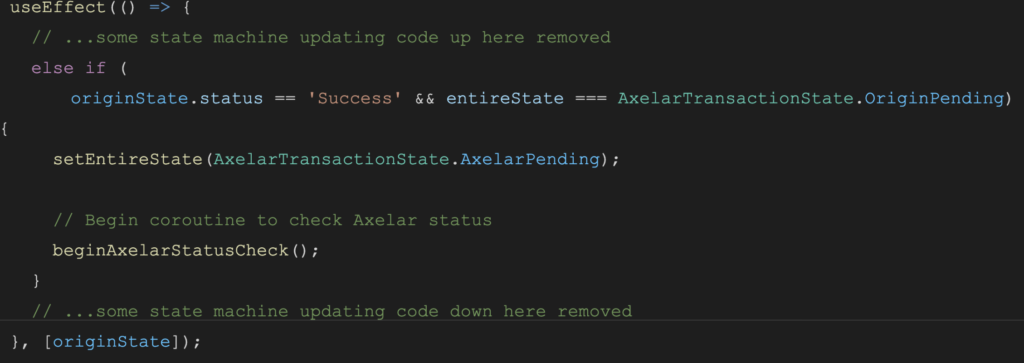
Now take a brief look at how to use the useEffect hook.
In the app, useEffect will fire when values that it watches change, in this case, the originState. While there’s additional code in the useEffect callback function that changes the entireState enum, the most important part is when it encounters a success response from the origin chain’s transaction. It appropriately sets the entireState enum, then calls beginAxelarStatusCheck.
Recall that the strategy to monitor transactions is to:
- Monitor the origin chain transaction.
- Monitor the next transactions with the Axelar SDK.
useDApp will help monitor the origin chain transaction with the useContractFunction hook. beginAxelarStatusCheck will let us monitor the next transactions.
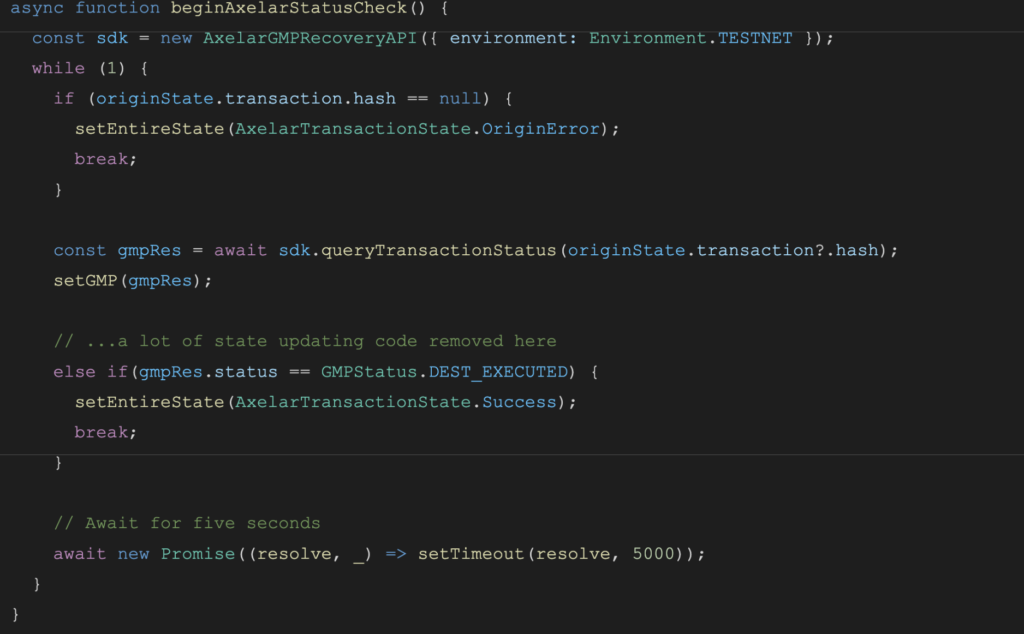
While there’s a lot of state-interpreting logic removed from the function in the code snippet below, the main logic still remains. First, the AxelarGMPRecoveryAPI from the Axelar SDK is initialized because it provides the functions to query transaction state, which bluntly lets the frontend know if any transaction fails. Then, the status is queried and stored in state. Finally, the program waits an arbitrary 5 seconds before querying again unless the transactions have finished.
While requerying every 5 seconds might not seem like an optimal solution, it is the easiest way to do it with Axelar. If you opt to use another of Moonbeam’s connected contract providers, you might do something similar or find an available pub/sub service. Either way, as long as the frontend is fed data about each network’s transaction, and handles it appropriately, it’ll work.
The data provided by the useAxelarFunction hook will allow the program to properly update the frontend. For example, a user can determine whether the Axelar network’s transaction is either pending, has succeeded, failed, or if it’s too early to tell:

And then that data can be displayed to the user.

If you want, you can take a look at the entire repository to see how all the parts work together, and specifically what data is managed and interpreted to make a readable interface.
Using the Frontend
Try using the frontend to see how it all works together. You can either access it on its website or by cloning the public repository and running it yourself. If you do choose to clone the repository, you can start it with the following command (after installing the packages):
![]()
Click the button in the top right corner to connect to your wallet. You can send a transaction with the upper section by entering a message, setting the origin and destination chains, and pressing the submit button. Read from each chain’s connected contract in the bottom section by selecting the chain you want to read from.

As you transition from your current development background into one that can work with connected contracts on Moonbeam, you’ll find more ways of handling multichain dApps. Regardless of what tech stack you choose for your own project, on top of the normal difficulties of creating dApps, you will have to find a way to manage multiple transactions, chains, and contracts (from multiple chains).
Good luck!
Learn More About Connected Contracts
The best way to learn is to get hands on, so every reader is encouraged to try creating a connected contract dApp on their own! Moonbeam offers extensive developer support, and Axelar (among other connected contract communities) are willing to help you from start to finish. If you’re looking to learn more about how to develop on Moonbeam, the Moonbuilder’s program is an extensive look at how to build your own dApps.
Learn more about Axelar on their website, docs, and Discord channel. Read about how Moonbeam is shaping up to be the leader in blockchain interoperability in our introduction to connected contracts.
If you are interested in Moonbeam and want to learn more, subscribe to our newsletter and follow us on social (links in the page header).