

Cross-Chain Connected Contracts with Wormhole’s Relayer Engine
Nov 30, 2022
29 min read
Share
If it isn’t apparent already, Moonbeam is a hub for cross-chain communication. Protocols like AxelarGo to page https://moonbeam.network/blog/connected-contracts-axelar/, LayerZeroGo to page https://moonbeam.network/blog/connected-contracts-layerzero/, and HyperlaneGo to page https://moonbeam.network/blog/connected-contracts-with-hyperlane/ allow for smart contracts on different EVMs to communicate with each other, unlocking new scales of functionality for Web3 dApps. But so far, the aforementioned protocols’ smart contract communication is limited to only EVM chains. This is why Wormhole’s ability to communicate with non-EVM chains like Solana, NEAR, and Algorand is a notable outlier in the world of Moonbeam’s connected contracts.
Most multichain dApps are currently unified interfaces for protocols duplicated across multiple EVMs. Using Wormhole’s verifiable action approval (VAA) messaging system, dApps can become multichain aware, allowing for advanced interoperability and functionality between what would otherwise be isolated ecosystems.

Wormhole is significantly different from other cross-chain protocols covered by Moonbeam, so if you are already familiar with other cross-chain protocols, you’ll still want to pay attention. As a demonstration, you will walk through a demo that sends and stores a string from one TestNet EVM to another via Wormhole. This project will require you to install Docker to help run a component known as a relayer. If you don’t have MetaMask set up for it yet, you can add the Moonbase Alpha network on the docs site.
Intro to Wormhole
Wormhole is a multi signature schemed protocol that validates and secures cross-chain communication through VAAs. VAAs, or verifiable action approvals, are Wormhole’s version of validated cross-chain messages. To put it simply, Wormhole’s protocol has 19 actors known as guardians that receive and validate cross-chain messages. If 13 out of those 19 actors validate a particular message, the message becomes approved and can be received on other chains.
Adjacent to the guardian network (which act as the validators of Wormhole’s protocol) are the network spies. They don’t do any validation work, and they’re not here to engage in highly-classified espionage either. Instead, they watch the guardian network and act as an interface to allow users and applications to see what VAAs have been approved.
Like other cross-chain protocols that Moonbeam has covered, once a message has been verified, off-chain actors known as relayers can send the data to other blockchains in a trustless manner. Unlike other cross-chain protocols that Moonbeam has covered, Wormhole currently doesn’t have a finished generic relayer.
The relayer’s role is to pay for the destination chain’s execution, and in many general relayers, in turn the relayer is paid by the user. Wormhole does not have this available yet, so instead Wormhole’s architecture requires dApp developers to create and maintain their own specialized relayers. A developer would have to design their own system if they wished to have the contract caller pay for gas on the destination chain. This might seem like a greater amount of work, but it allows for more fine-tuning of how messages are handled. For example, a relayer could send the same message to multiple chains at the same time.
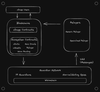
Image from WormholeGo to page https://wormhole.com/
To send a cross-chain message, you will need to use a smart contract. Every chain connected to Wormhole will have some sort of implementation of the Wormhole core bridgeGo to page https://github.com/wormhole-foundation/wormhole/blob/dev.v2/ethereum/contracts/interfaces/IWormhole.sol, whose purpose is to publish and verify VAAs. Each implementation of the core bridge contract (one per chain) is watched by every guardian in the guardian network, which is how they know when to start validating a message.
You as a developer will interact directly with the core wormhole smart contract by both sending and validating VAAs. You will also have to run a non-validating spy node and a specialized relayer. Don’t worry though, this blog will take you through it step by step to make it as understandable as possible.
Connected SimpleGeneralMessage Contract
Unlike other cross-chain protocols, Wormhole doesn’t provide a parent smart contract to inherit from for users to build off of. This is because Wormhole’s first chain, Solana, doesn’t have typical inheritance in their smart contracts like Solidity provides. To keep the design experience similar on each chain, Wormhole has their solidity developers interact directly with the Wormhole core bridge smart contract on EVM chains.
The smart contractGo to page https://github.com/papermoonio/wormhole-example-relayer-engine/blob/main/SimpleGeneralMessage.sol that you will be deploying today is stored in a Git repository that is forked from Wormhole’s relayer engine repository. You will deploy it with Remix, and the contract can be copied and pasted from this Github link.Go to page https://github.com/papermoonio/wormhole-example-relayer-engine/blob/main/SimpleGeneralMessage.sol
First things first, the code in this smart contract is based off of Wormhole’s best practices documentationGo to page https://docs.wormhole.com/wormhole/quick-start/cross-chain-dev, but simplified in certain areas (like security). When writing a smart contract for production, review their documentation for a better understanding of standards. To be clear, do not use the following smart contract in production. For today’s demonstration purposes, however, you’re aiming to simply get the system to work.
Sending VAAs
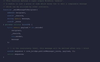
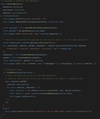
Take a look at the message sending portion of the smart contract in either the source file or the pictures below. The external facing function includes three parameters: the message string, the destination address, and a destination chainId. The destChainId value to blockchain mapping can be found in Wormhole’s documentation.
Note that the destination address is an address type, and not a bytes32 type. This is significant because chains like NEAR, Algorand, and Solana use bytes32 addresses, which are larger. The SimpleGeneralMessage smart contract uses the address type because previous blog posts also used this type, but if you were to build your own dApp it is recommended to use a bytes32 address input so that you can communicate with non-EVM blockchains.
The function itself has two lines. The first invokes a private function that will interact with the Wormhole core bridge. The reason this functionality is segregated from the sendMessage function is that Wormhole has a convention to return a sequence value from all message-publishing functions. The sequence value represents the number of times that a Wormhole message has been sent from a smart contract. For example, the first message sent will return 0, then the second message will return 1, and so on. This value can be helpful for receiving messages in order, but is out of scope for this blog post.
The second line increases the global nonce (number used once) value. Nonces can be reused to batch VAAs together, but that is also out of scope for this blog post. In this case, each message will have a unique nonce value just for good practice to ensure that the nonce is, in fact, a nonce. Though you could leave the nonce as 0 for all messages and the system would still work.

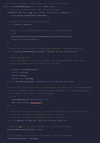
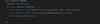
Continuing our break-down of message sending, take a look at the private function called by the sendMessage function, _sendMessageToRecipient, which is shown below. The first line of code encodes data into a bytes payload. It encodes the address of the recipient, the chainId that the message should be sent to, the sender of the message, and the message itself. This information will be important for both the relayer and the destination connected contract to parse.
The second line of code interacts with the Wormhole core bridge contract to publish a message. Note that the inputs include a nonce, a payload, and a consistency level value. The nonce value was injected from sendMessage, and isn’t useful for this scenario. The payload is what was encoded in the previous line of code. The consistency level controls how many blocks since the transaction originally occurred the guardian network should wait before the message begins the validation process. This can be helpful for security reasons, as some blocks have slower finality than others, like Ethereum. For testing, however, 1 should be enough.
That’s it for sending the message. If you have experimented with other connected contract protocols, then you might notice that there is no method of paying for the destination chain’s transaction with the origin chain’s currency. That is because in protocols where that is possible, the relayer is managed by the protocol. The relayer pays for the destination chain’s execution, and in turn the relayer is paid by the user. In this case, however, you will be running your own relayer. You would have to design your own system if you wished to have the contract caller pay for gas on the destination chain.
Moving forward, look at how the SimpleGeneralMessage smart contract receives a VAA.
Receiving VAAs
Wormhole recommends some sort of whitelisting of VAA emitters, so the function that receives a VAA will check for trusted addresses. To add trusted addresses, SimpleGeneralMessage includes the helper function addTrustedAddress. In a production environment, this helper function should also check to see if the caller has permission to add a trusted address (such as using OpenZeppelin’s onlyOwner modifier), but for a testnet, this is as far as you’ll go with security.

Now into the thick of things. processMyMessage (seen below) is how SimpleGeneralMessage receives VAAs. This name was chosen arbitrarily, since the custom relayer will be able to call any function with any name. In other connected contract protocols, where a public generic relayer handles the destination chain’s execution, a specifically named external facing function is often required. But since Wormhole dApp developers run their own specialized relayer, the receiving function can be whatever the developer wants.
The only parameter that processMyMessage takes in is a bytes object called VAA. Developers won’t have to manually create the VAA object, since Wormhole largely automatically does it. The VAA has a lot of information packed into it, which gets decoded into a VM struct if valid. This struct can be viewed in its entirety in Wormhole’s repositoryGo to page https://github.com/wormhole-foundation/wormhole/blob/dev.v2/ethereum/contracts/interfaces/IWormhole.sol.
This first line of code, with core_bridge.parseAndVerifyVM, has the Wormhole core bridge verify on-chain that the signatures included with the VAA are correct. It returns parsed data, a boolean to indicate success or failure, and a string to represent an error if it occurred. The second line of code reverts if the parseAndVerifyVM function returns false for its boolean (VAA is not valid), and will display the reason for the failure.
The third line of code, the require statement with myTrustedContracts, invokes the whitelisting functionality that was previously mentioned. Trusted contracts are stored in a nested map, and checking it against the VAA’s emitter will ensure that the emitter (the connected contract on the origin chain) is trusted.
The fourth line of code, another require statement with processedMessages, checks to ensure that the VAA has not already been processed. Remember that VAAs can be picked up by anyone with a spy node, and if there are multiple relayers that are looking to do the same thing, then the message will attempt to be processed multiple times. You’ll see later (line eight) that the processMyMessage function will write to processedMessages with a VAA hash to make sure that the message its processing won’t be processed more than once.
The fifth line of code with abi.decode decodes the payload into four values so that the message can be stored. Note that it was decoded in the same way that it was encoded.
The sixth line of code, a require statement with intendedRecipient, checks to make sure that the intendedRecipient of the message, which was included in the payload, is the same address as this smart contract. Cross-chain messages sent through the Wormhole protocol are only verified to occur. It does not verify if a message is meant to be sent to one or more specific contracts. This is why the contract must check manually if incoming messages are intended for it. Along similar lines, the seventh line of code checks to ensure that the message is sent to the right chain.
The eighth line of code, which adds to the processedMessages map, writes to a map within the smart contract to ensure that the same message doesn’t get parsed twice (told you that you’d see it later). The message hasn’t been completely processed at this point, but it might be better to finish this step lest a complex interaction (for contracts more important than this) further along the line leads to a reentrancy attack.
Finally, on the ninth line with lastMessage, at long last, the string that was sent from the origin chain to the destination chain is written to the smart contract.
You might want to take a bit of a breather, but soon you will deploy the contract! Doing is the best way to learn, so try to follow along with the deployment and message passing yourself on Moonbase Alpha.
Deploying the Wormhole Contract with Remix on Moonbase Alpha
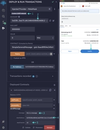
The easiest way to deploy the single demo contract is through RemixGo to page https://docs.moonbeam.network/builders/build/eth-api/dev-env/remix/. You’ll need DEV to deploy on Moonbase Alpha, which you can get from our faucetGo to page https://faucet.moonbeam.network/ if you don’t have any already.
To deploy the script, copy and paste the contractGo to page https://github.com/papermoonio/wormhole-example-relayer-engine/blob/main/SimpleGeneralMessage.sol into Remix.
- Go to the Solidity Compiler tab
- Press the Compile button
- Then, go to the Deploy & Run Transactions tab of Remix
- Set the environment to Injected Web3. This will use MetaMask as the Web3 provider. Ensure that your MetaMask is connected to the Moonbase Alpha network

To deploy on each chain, you will need the local instance of the Wormhole core bridge and the chain Id of the chain mentioned. All of this data has been provided for a select few TestNets in the table below. You can find other networks’ endpoints on Wormhole’s documentation siteGo to page https://docs.wormhole.com/wormhole/reference/constants. Keep in mind that you should only use EVMs for this demonstration, since the smart contract and relayer designed for this blog post only supports EVMs.
Once the contract has been deployed on Moonbase Alpha make sure to copy down its address and repeat the process with one of any of the other EVM TestNetsGo to page https://docs.wormhole.com/wormhole/reference/constants that are connected to Wormhole so that you can send a message across chains.
Network & Faucet | Wormhole Core Bridge | Wormhole Chain ID |
Polygon MumbaiGo to https://faucet.polygon.technology/ page to Polygon Mumbai | 0x0CBE91CF822c73C2315FB05100C2F714765d5c20 | 5 |
Avalanche FujiGo to https://core.app/tools/testnet-faucet page to Avalanche Fuji | 0x7bbcE28e64B3F8b84d876Ab298393c38ad7aac4C | 6 |
0x1BB3B4119b7BA9dfad76B0545fb3F531383c3bB7 | 10 | |
0x706abc4E45D419950511e474C7B9Ed348A4a716c | 2 | |
0xa5B7D85a8f27dd7907dc8FdC21FA5657D5E2F901 | 16 |
Whitelisting Moonbase Alpha’s Connected Contract
As previously mentioned, Wormhole recommends to include a whitelisting system in their connected contracts, which you will have to use in SimpleGeneralMessage before attempting to send a cross-chain message.
Recall that to add a whitelisted contract, you must invoke the addTrustedAddress function, which requires a bytes32 formatted address and a chain ID. You can find the chain ID in the table above and on Wormhole’s documentationGo to page https://docs.wormhole.com/wormhole/reference/constants.

You might notice that the sender parameter is a bytes32 instead of an address. Even though this blog post only expects to work EVMs, Wormhole’s VAAs provide emitter (origin) addresses in the form of bytes32, so they are stored and checked as bytes32.
To convert an address type to bytes32, you will need to pad an additional 24 zeros. This is because an address value is 20 bytes, less than the 32 for bytes32. Every byte has 2 hexadecimal characters, so:
(32 bytes – 20 bytes) * 2 “0”s to add/byte = 24 “0s” to add
For example, if your connected contract’s address was 0xaf108eF646c8214c9DD9C13CBC5fadf964Bbe293, you would input the following into Remix:
0x000000000000000000000000af108ef646c8214c9dd9c13cbc5fadf964bbe293
Now go ahead and use Remix to ensure that your two connected contracts trust each other. You will have to do this on both contracts that you have deployed if you intend to send messages back and forth. To switch between contracts on different chains, connect to the destination network through MetaMask.
- Make sure that you are in the Injected Provider environment
- Ensure that you are on the right account
- Also check that the contract is still SimpleGeneralMessage.
- Finally, take the address of the destination contract, and paste it into the At Address input

To add trusted remote addresses:
- Find the addTrustedAddress function within the deployed contract and open it.
- When you are on Moonbase Alpha, set the sender as the properly formatted (padded with 24 zeros) address of the contract you deployed on the other EVM TestNet.
- Set the _chainId as the Wormhole chainId of the chain that the other contract is deployed on. Afterwards, transact and confirm in MetaMask.
When you are on the alternate EVM TestNet, set the sender as the properly formatted (padded with 24 zeros) address of the contract you deployed on Moonbase Alpha. Set the _chainId as the Moonbase Alpha’s Wormhole chainId (16). Finally, transact and confirm in MetaMask.

In this section you should have sent two transactions on two chains to whitelist addresses in both contracts. Afterwards, you should be allowed to send messages between the connected contracts.
How to Run a Wormhole Testnet Relayer & Guardian Network Spy
Now you will run a TestNet relayer for Wormhole! This walkthrough is based off of Wormhole’s relayer-engineGo to page https://github.com/wormhole-foundation/relayer-engine Github repository, which as of time of writing, is on commit dac6012Go to page https://github.com/wormhole-foundation/relayer-engine/tree/dac6012cc7ed9c3ca79d911b47f39bfe9dd76a23. It’s in relatively active development, which can cause great changes in the structure of the folders.
Clone the fork of the relayer-engineGo to page https://github.com/papermoonio/wormhole-example-relayer-engine that has been prepared specifically for interacting with SimpleGeneralMessage. DockerGo to page https://docs.docker.com/get-docker/ and npmGo to page https://docs.npmjs.com/downloading-and-installing-node-js-and-npm are required to run this relayer, so be sure to install them to your device.
First things first: the setup. Use the npm package manager to install dependencies using the command line.

Once that’s finished, take a look around at the different folders. There are two main folders: relayer-engine and example-project. The relayer-engine includes the components that help run the relayer, whereas the example-project folder contains the plugin scripts and configuration files that are specific to the SimpleGeneralMessage smart contract. There’s also a README.md file in the root directory, which will include additional information about the relayer and how to set it up.
But before going into detail about how to run anything or how any of the plugin scripts work, you need to understand the different components of the relayer and what the relayer does.
The relayer filters and receives VAAs from the guardian network and does “something” with it. In this case, the relayer will filter messages approved by the guardians that originate from your deployed connected contracts, then parse the VAA, then determine its destination, and finally attempt to execute a function called processMyMessage at the destination. It is important to understand that other relayers from other actors can receive this VAA and that other relayers can execute any VAA in any way they see fit.
From a technical standpoint, the implementation of this relayer has four parts.
- A non-validating spy node that watches the Wormhole guardian network for all VAAs
- A component known as a listener, which receives the output of the spy node, filters out which ones are relevant to the relayer, and packages them into workflow objects
- A Redis database that stores the workflow objects that the listener outputs
- A component known as an executor, which pops workflows off the database and processes them in some way (in this case, sends a transaction on the destination chain)
There is a docker container that takes care of the spy node, which is easy to spin up. The relayer-engine package, stored in the similarly named folder, contains much of the code for the listener and database portions. Much of the logic for the executor will depend on the plugin that the developer writes (which you cloned from the repo), but much of the boiler-plate code is still handled by the relayer-engine package.
It’s best to tackle the configuration and setup of these four components in order, so start with the spy node. First, in the command line, make sure that you are in the example-project directory. The spy node uses docker, so ensure that docker is active before attempting to start the node. The command to start the container is long, so to simplify things, it’s been added as an npm script. Just run:

First, you should see a few logs from the startup of the docker container. Then, a lot of logs should be spamming the console. These are all the VAAs that are going through the Wormhole testnet, and there are a lot! Don’t worry, you won’t have to decipher any of these logs: the code can do that for us. Leave this running in the background and get another terminal instance to move on to the next step.

Listener Component
Now to break down the custom code and configurable component of the relayer. The listener component, aptly named, listens to the spy node for relevant messages. To define what the relevant messages are, you must edit a config file.
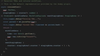
In example-project/plugins/simplegeneralmessage_plugin/config/devnet.json, there exists an array named spyServiceFilters. Each object within this array whitelists a contract’s VAAs as relevant to the relayer. The object takes in a chainId (Wormhole chainId) and an emitterAddress. For example, in the image below, the first object will watch for VAAs sent by 0x428097dCddCB00Ab65e63AB9bc56Bb48d106ECBE on Moonbase Alpha (Wormhole chainId is 16).
Be sure to edit the spyServiceFilters array so that the relayer listens to the two contracts that you deployed.

In the simplegeneralmessage_plugin folder, open up src/plugin.ts. This file contains plugin code for both the listener and executor components of the relayer, but the comments should make it obvious which functions are relevant to which component. Snippets of the file are shown below and you should be following along, but in case you aren’t, the entire file can be accessed in its Github repositoryGo to page https://github.com/jboetticher/relayer-engine/blob/main/example-project/plugins/simplegeneralmessage_plugin/src/plugin.ts.
Look at the getFilters function below. Notice something familiar? The spyServiceFilters object is injected into the plugin class that the getFilters is part of. Note that no filtering is being done, this is only the preparation of the filters. The actual filtering of VAAs occurs within the relayer-engine package, which uses this getFilters function to understand what to filter.
If a developer wanted to add additional logic to the filters, they could here, but for your purposes, simply listing some hard-coded addresses is fine.

After filtering, the listener needs to write to the Redis database with workflow data in the consumeEvent function below.
A workflow is just data that the executor needs from the listener to do a proper execution with. In this case, the only information that is being added to the workflow is the time at which the VAA was received and the parsed data in the VAA itself. If a developer wanted to add more relevant information to the workflow, they could do so in the workflowData object.
The nextStagingArea object is a way for consumed events (filtered VAAs) to affect each other. For example, if a developer wanted to package two VAAs together into one workflow, they wouldn’t return a workflowData every time. Instead, they would leave the VAA in the nextStagingArea object. The next time an event is to be consumed, the stagingArea object injected into the consumeEvent function would have that previous VAA to work with. In this case, nothing special is happening, and the relayer just handles each workflow in order.
That’s all that’s necessary for the listener component. Fortunately, most of the code is hidden from the user within the relayer-engine package.
If you recall the list of components, the third is the Redis database component. Everything that has to do with the database is hidden from the user as well, since the relayer-engine package will write & read from it, then inject any relevant data back into the plugin code. There’s nothing more that needs to be done for it, so feel free to take a break.
Executor Component
Finally, you must handle the executor component. Recall that the executor component takes workflow data from the Redis database and does some sort of execution action with that data. For most relayers, this execution will involve an on-chain transaction, since a relayer acts as a trustless oracle for VAAs.
The relayer-engine package helps handle the wallets for the plugin. Currently, the package only supports Solana and EVM wallets, but with further development more chains will be supported. But it’s not impossible to integrate NEAR or Algorand into the relayer, since you would just have to write your own wallet handling system in addition to the one already provided by the package.
To work with the built-in wallet handling system provided by the package, open the file at example-project/relayer-engine-config/executor.json.example. This example script is provided to show you how to format your private keys (the current key is provided by Wormhole).
Rename the example file to executor.json. In the privateKeys object of executor.json, replace the content of each array with your private key. The account of the private key entries will be the one that pays for execution fees in the relayer’s executor component.
Please manage your keys with care, as exposing them can result in loss of funds. While executor.json is ignored by git in this repository, please be sure that the wallet you are using for testnet has no mainnet funds.
If you are using a chain that wasn’t listed in the EVM TestNet table above, you will have to add your own array. The key for this array should be the Wormhole chainId of the other EVM that you chose to deploy on before. For example, if you deployed on the Fantom TestNet, you would add the following object, since the Wormhole chainId of the Fantom TestNet is 10.

Now that the wallets are sorted out for the executor, look at the code of the executor itself, which is in the example-project/plugins/simplegeneralmessage_plugin/src/plugin.ts file. If you haven’t been following along, the entire file can be accessed in its Github repository.
The handleWorkflow function is where all of the logic is, though there are some helper functions underneath it. This is the function that the relayer-engine package invokes when there is a workflow in the Redis database that’s to be used. Notice the three parameters that are injected into the function: workflow, providers, and execute.
- The workflow object provides the data that was stored in the database during the listener component’s execution of the consumeEvent function. In this case, only the VAA and time it was received was stored in the database, which are stored in the local payload variable.
- The providers object injects ethers and other chains’ providers, which might be helpful for querying on-chain data or doing other blockchain related actions. As mentioned before, the only providers that are currently supported by the package are Solana and EVMs. The providers object isn’t used in this implementation.
- The execute object currently has two functions in it: onEVM and onSolana. These functions require a Wormhole chainId and a callback function that has a wallet object injected into it. The wallet included is based off of the private key that was configured in the executor.json file.
The first substantial thing this function does is parse the payload object, then parse its VAA with some helper functions. Afterwards, it takes the payload, converts it into a hexadecimal format, and uses the ethers utility to ABI-decode the payload into its separate values that were defined way-back-when in the smart contract.
With the data that was decoded by ethers, it’s possible to figure out to which contract and which chain the payload is being sent to, since that data was packaged into the message. The function checks if the specified destination chainID belongs to an EVM, and will execute using the execute.onEVM function mentioned before. Otherwise, it logs an error since this system doesn’t expect to interact with non-EVM chains for simplicity.
In the callback function, it creates a contract objectGo to page https://docs.ethers.org/v5/api/contract/contract/#Contract with the ethers package. The ABI that it imports is exported from the SimpleGeneralMessage contract’s compilation, so this code is assuming that the recipient of the message specified in the VAA is or inherits from a SimpleGeneralMessage contract.
Then, the code attempts to execute the processMyMessage function with the VAA, which was previously defined as the function that messages are relayed to. Recall that this function name was arbitrarily chosen for the smart contract because the relayer could specify any function to call. That freedom is expressed in the ability for a developer to change this relayer’s code!
The final piece is to check example-project/relayer-engine-config/common.json. This config file controls the execution of the entire relayer. Ensure that the TestNet EVMs that you are using are listed within the supportedChains object of this file. The plugin will not run properly if it’s not listed. If a chain that you are using is not listed, you will have to import the data from Wormhole’s developer documentationGo to page https://docs.wormhole.com/wormhole#testnet into the config file in a format like below.
There are also additional configurations for the relayer. For example, the mode string is set to “BOTH” to ensure that both the listener and executor plugins are used, but a developer could decide to run only one if they wanted. Additionally, there are multiple log levels to specify, such as “error” for just error messages. For this demo, however, just leave the configuration settings as is.
That’s it for the configuration! Now to run it. In your terminal instance (one that isn’t running the spy node), navigate to the example-project folder. Run the following command:

You should see something similar to the logs below in the console.

Oh boy, you got through that whole section too? Pat yourself on the back! When you’re ready, move on to the next step.
Sending a Cross Chain Message from Moonbase with Wormhole
Now, to send a cross chain message, you just need to call the sendMessage function.
Use the Remix interface. This example is going to send a cross-chain message to the Fantom TestNet, but you can substitute the destChainId for whichever EVM you desire. Check the following things:
- The environment is Injected Provider on network 1287 (Moonbase Alpha)
- You have substantial funds in your wallet from the faucetGo to page https://faucet.moonbeam.network/ to cover the transaction gas cost on both the origin and destination chains
- Put a short message of your choice in the message input of the sendMessage call (in this case “this is a message”)
- Put the address of your instance of SimpleGeneralMessage on destination chain in the destAddress input
- Put the destination chain’s Wormhole chainId in the destChainId input of the sendMessage call
- Once this is all done, transact the execution and confirm it in MetaMask
Tracking Cross Chain Messages
After sending your transaction, you should be able to go into the Moonbase block explorerGo to page https://moonbase.moonscan.io/ to take a look at the transaction using its transaction hash. If everything went well, it should be confirmed, and you’ll be able to see traces of the input of your transaction at the very bottom when viewing it as UTF-8.

In a typical transaction, you would be able to see the status and data of the transaction on a single page on a single explorer. But, since this is cross-chain messaging, there are really two EVM transactions happening on two chains.
You should be able to see your relayer output some logs in the console within 60 seconds of sending the message on Moonbase Alpha. Note that the relayer printed out a lot of information about the VAA, including the message itself. Any relayer will be able to see all of the information in your VAAs.

If everything goes smoothly, your transaction will be approved and you will be able to see the lastMessage updated in the origin chain from your successful cross-chain transaction! If it doesn’t automatically update, don’t worry. It’ll take a few seconds for it to properly go through.
If you want to see the message stored in the contract, you can do so through Remix. Like when setting the trusted addresses, connect to the destination network through MetaMask. Make sure that you are in the Injected Provider environment and that the contract is still SimpleGeneralMessage. Then take the address of the destination contract, and paste it into the At Address input.
- Press it, and you should be able to use the outcome contract to view the lastMessage button
- Paste your wallet address in the input
- Finally, click call to see the resulting message

Learn More About Connected Contracts
Moonbeam’s vision for an interoperable hub of networks doesn’t stop here. Learn more about Wormhole on their websiteGo to page https://wormhole.com/, how to send cross-chain messages in the Wormhole documentationGo to page https://docs.wormhole.com/wormhole, and read about how Moonbeam is shaping up to be the leader in blockchain interoperability on our connected contracts pageGo to page https://moonbeam.network/builders/connected-contracts/.
If you are interested in MoonbeamGo to page https://moonbeam.network/ and want to learn more, subscribe to our newsletterGo to page https://moonbeam.network/newsletter/ and follow us on socials (links in the page header).