


Cross-chain communicationGo to page [object Object] lives at the heart of Moonbeam, which is why Hyperlane, another cross-chain protocol, has deployed on Moonbeam. Similar to previously introduced protocols AxelarGo to page [object Object] and LayerZeroGo to page [object Object], Hyperlane allows developers to write smart contracts that can communicate across blockchains, which lets developers build cross-chain connected applications on Moonbeam that can tap into functionality from Polkadot, Ethereum, Avalanche, and beyond.
Multichain dApps are currently unified interfaces for protocols duplicated across multiple EVMs. Protocols will be able to connect their contracts cross-chain using Hyperlane’s general message passing to become multichain aware, allowing for advanced interoperability and functionality between what would otherwise be isolated ecosystems.
To demonstrate the power of connected contractsGo to page [object Object], walk through this demo that sends and stores a string from one TestNet EVM to another. The demo requires a MetaMask account with the Moonbase Alpha network added, which can be accomplished by visiting the Moonbeam docs siteGo to page [object Object].
Intro to Hyperlane Contracts
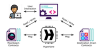
HyperlaneGo to page [object Object] is a delegated proof of stake chain protocol that validates and secures cross-chain communication via configurable consensus methods. Every validator in Hyperlane’s network will validate for every chain that Hyperlane is connected to. Hyperlane’s protocol includes verifiable fraud proofs that can be calculated by its network of WatchtowersGo to page [object Object] to prove if a cross-chain message provided by a validator is valid or not. These proofs will adapt based on which consensus methodGo to page [object Object] (proof-of-stake, multisig, etc) a dApp desires to use, though most dApps will use proof-of-stake by default.

Image from HyperlaneGo to page [object Object]
Cross-chain messages are routed through Hyperlane’s Outbox and Inbox smart contracts. Inboxes are the smart contract that receives and processes messages. Each Hyperlane-connected chain has multiple Inboxes deployed, since each Inbox only connects to one other chain. The Outbox is a smart contract through which messages can be sent to other chains. Each chain has only one Outbox deployed on it. To help manage the Inbox and Outbox smart contracts, Hyperlane has a contract that is currently named the AbacusConnectionManagerGo to page [object Object] (Hyperlane used to be named Abacus). To help manage gas payments on the destination chain, Hyperlane has another contract named the InterchainGasPaymaster.Go to page [object Object]
You as a developer will deploy a smart contract that interacts with all of these contracts, though most of that smart contract code will be packaged into a parent smart contract for you to use without needing to look at the implementation details.
Connected SimpleGeneralMessage Contract
Hyperlane currently recommends using its Quickstart guidesGo to page [object Object] to get a feel for their protocol, which are great resources to understand how cross-chain messages are sent and received. This guide, which was developed in part using Hyperlane’s template projectGo to page [object Object], will help with understanding how cross-connected contracts are deployed and written.
Instead of setting up an entire Git repo, this guide will use a popular tool, Remix, to deploy and interact with contracts. To understand what you’re doing, take a look at the contract that you’ll deploy, which has been made available in a Github gistGo to page [object Object], or can be accessed with this Remix linkGo to page [object Object].
The contract’s parent is RouterGo to page [object Object], which was imported from a Hyperlane package.Go to page [object Object] This parent contract abstracts away the difficulties of interacting with the Inbox and Outbox contracts, making it easier to write a connected contract. For the sake of simplicity, this post will not go in depth into the Router contract, but there are two points that are important for understanding the deployment steps.
First, note that there is a _handle function for smart contract developers to override. When an Inbox contract receives a message that is directed to a smart contract, it will call an external function called handle. The handle function will call _handle after a few checks, so the _handle function is effectively where the smart contract will receive and react to a cross-chain message.
Second, understand that there is a router enrollment system that acts as a whitelist for each contract. A Hyperlane connected contract cannot send a message to another that doesn’t enroll them (if the destination implements the Router contract). The Router contract will have many external functions that will have the onlyRemoteRouter modifier applied to them, which invokes the aforementioned whitelist system.
When deploying, you will have to interact with the router enrollment system so that the connected contracts know which contract to send a message to.
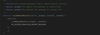
But before you deploy, first review the sendMessage function in the SimpleGeneralMessage smart contract. If you’ve looked at our previous blog posts that introduced AxelarGo to page [object Object] and LayerZeroGo to page [object Object], you’d correctly guess that this function similarly sends a message across chains. If you haven’t, well, now you know. Hyperlane’s Router contract provides perhaps the most abstracted version available, requiring only a domain (Hyperlane’s version of a chain ID) for the destination chain and a payload to begin a cross-chain message.
The first line packs the message sender and the string message into a bytes object, since that is the format that most cross-chain general message systems use to send and receive data. The second will dispatch the message to the local chain’s Outbox contract and pay for the message’s destination chain execution with the InterchainGasPaymaster.
Note that the message is payable. Since this invocation of the _dispatchWithGas function includes msg.value as its third parameter, the entirety of the transaction’s value will be sent as gas to pay for the execution on the destination chain. The reason why there needs to be a second gas payment is that the gas paid in the execution of the transaction is only for the origin chain, and additional value must be sent to pay for the destination chain’s execution to complete a cross-chain message.
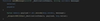
Now look at how the connected contract receives a message. When an Inbox contract receives a message that’s directed towards a connected contract, it will call that contract’s external handle function and pass in relevant data. The Router function that your connected contract inherits from includes this handle function. Along with additional behind-the-scenes logic, it calls the internal and overridable _handle function as seen below, which allows developers to customize their smart contract’s logic when receiving a message.
In this case, the first thing that the _handle function does is decode the message that was packed by the remote contract’s sendMessage function. Then, on the second line, it stores the resulting message to be read in the future.
The code was relatively simple, so now you will deploy the contract! Doing is the best way to learn, so try to follow along with the deployment and message passing yourself on Moonbase Alpha.
Deploying with Remix on Moonbase Alpha
The easiest way to deploy the single demo contract is through RemixGo to page [object Object]. DEV is required to deploy on Moonbase Alpha, which is available from the faucetGo to page [object Object] if you don’t have any already.
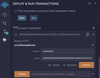
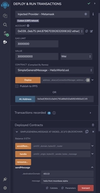
To deploy the script, first copy and paste the contractGo to page [object Object] into Remix or open it up directly from this Remix gist linkGo to page [object Object]. Then compile in the Solidity Compiler tab. Ensure that your MetaMask is connected to the Moonbase Alpha network. Then, in the Deploy & Run Transactions tab of Remix, set the environment to the Injected Web3. This will use MetaMask as the Web3 provider.
To deploy on each chain, you will need the local instances’ addresses of two previously mentioned contracts: AbacusConnectionManager and InterchainGasPaymaster. Additionally, you will need the Hyperlane domain for a future step. All of this data has been provided for a select few TestNets in the table below. You can find other networks’ endpoints on Hyperlane’s documentation siteGo to page [object Object].
Once the contract has been deployed on Moonbase Alpha, make sure to copy down its address and repeat the process with one of any of the other EVM TestNetsGo to page [object Object] that are connected to Hyperlane so it can send a message across chains.
Polygon MumbaiGo to https://faucet.polygon.technology/ page to Polygon Mumbai | 0xb636B2c65A75d41F0dBe98fB33eb563d245a241a | 0x9A27744C249A11f68B3B56f09D280599585DFBb8 | 80001 |
Avalanche FujiGo to https://core.app/tools/testnet-faucet page to Avalanche Fuji | 0x33AbaF6708be03Bdf0595DA0745A7111b01dB8c7 | 0x4834a491f78BBF48e983F9Ce0E20D1E4DbE013D8 | 43113 |
BSC TestNetGo to https://testnet.binance.org/faucet-smart page to BSC TestNet | 0xe403E16db1f5997bC62Dc611A8d42836364A7f01 | 0x155b1F1801030Ea4dF038107d3cc1b4bA496916e | 0x62732d74 |
GoerliGo to https://www.alchemy.com/faucets/ethereum-goerli page to Goerli | 0x01812D60958798695391dacF092BAc4a715B1718 | 0x44b764045BfDC68517e10e783E69B376cef196B2 | 5 |
0xD356C996277eFb7f75Ee8bd61b31cC781A12F54f | 0xeb6f11189197223c656807a83B0DD374f9A6dF44 | 0x6d6f2d61 |
Enrolling Remote Routers
As previously mentioned, there is a whitelisting security system that comes with the Router parent smart contract. If you followed along with the LayerZero blog postGo to page [object Object], you’ll note that they had a similar system when setting trusted remote addresses.
The Router contract currently allows only one smart contract per chain as an enrolled remote router, since it assumes that there is a single deployment on each chain that ought to communicate with each other. This isn’t a network-wide limitation though: you could write your own custom Router smart contract.
To enroll a connected Router contract, the following function must be called. Only the contract owner, in this instance the deployer, can set trusted remote addresses. The _domain parameter is the Hyperlane domain identifier for the chain that the contract should receive messages from, some of which were listed in the table above (the rest are on Hyperlane’s documentation site)Go to page [object Object]. The _router parameter is the connected contract address that messages should be received from that exists on the same chain as the domain identifier.

You might notice that the _router parameter is a bytes32 instead of an address. This is so that future non-EVM chains can be supported. You will need to pad an additional 24 zeros to the address when providing input in Remix. For example, if my connected contract’s address was 0xaf108eF646c8214c9DD9C13CBC5fadf964Bbe293, I would input the following into Remix:
0x000000000000000000000000af108ef646c8214c9dd9c13cbc5fadf964bbe293
Now go ahead and use Remix to ensure that your two connected contracts trust each other. You will have to do this on both contracts that you have deployed. To switch between contracts on different chains, connect to the destination network through MetaMask. Make sure that you are in the Injected Provider environment and that the contract is still SimpleGeneralMessage. Then take the address of the destination contract, and paste it into the At Address input.
To add trusted remote addresses, find the enrollRemoteRouter function within the SimpleGeneralMessage contract and open it.
When you are on Moonbase Alpha, set the _domain as the Hyperlane domain identifier of the other EVM TestNet that you chose (found in their documentationGo to page [object Object] or the table above). Set the _router as the properly formatted (padded with 24 zeros) address of the contract you deployed on the other EVM TestNet. Afterwards, transact and confirm in MetaMask.
When you are on the alternate EVM TestNet, set the _domain input as Moonbase Alpha’s Hyperlane domain identifier (0x6d6f2d61). Set the _router input as the properly formatted address of the contract you deployed on Moonbase Alpha. Finally, transact and confirm in MetaMask.
In this section, you should have sent two transactions on two chains to set trusted remote addresses in both contracts. Afterwards, you should be good to send transactions between the connected contracts.
Sending a Cross-Chain Message from Moonbase with Hyperlane
To send a cross-chain message with an automatic destination chain transaction, an additional gas payment must be sent with the Hyperlane message to offset the destination chain’s gas cost. This additional gas payment comes in the form of the native currency (GLMR, ETH, etc) that you include in the transaction, set as the value of the message.
Hyperlane has a helpful SDKGo to page [object Object] to help estimate the cross-chain transaction gas fee, but for this blog post it is out of scope. For simplicity, it’s best to send a large amount, such as 300000000 Gwei of the native currency, with the cross-chain message. Note that you should not do this in production, and that this gas overestimation is just for TestNet demonstration purposes. As of writing, Hyperlane’s gas refund feature is still in development, and any extra gas will be kept by the relayer.
Now use the Remix interface. This example is going to send a cross-chain message to the Avalanche Fuji TestNet, but you can substitute the gas value and chain name for whichever EVM you desire. Check the following things:
- The environment is Injected Provider – Web3 on network 1287 (Moonbase Alpha)
- You have substantial funds in your wallet from the faucetGo to page [object Object] to cover both the transaction cost and the DEV included for destination chain gas
- You have the gas fee as 300000000 Gwei in the previous step placed in the value input
- Put a short message of your choice in the message input of the sendMessage call (in this case “hello from moonbase alpha”)
- Put the destination chain’s Hyperlane domain identifier in the _destinationDomain input of the sendMessage call
Once this is all done, transact the execution and confirm it in MetaMask.
Tracking Cross-Chain Messages
After sending your transaction, you should be able to go into the Moonbase Alpha block explorerGo to page [object Object] to take a look at the transaction using its transaction hash. If everything went well, it should be confirmed, and you’ll be able to see traces of the input of your transaction at the very bottom when viewing it as UTF-8.

In a typical transaction, the status and data of the transaction would be available on a single page on a single explorer. But, since this is cross-chain messaging, there are really two EVM transactions happening on two chains.
If everything goes smoothly, the transaction will be approved and you will be able to see the lastMessage updated in the origin chain from the successful cross-chain transaction! If it doesn’t automatically update, don’t worry. It’ll take a few seconds for it to properly go through.
If you want to see the message stored in the contract, you can do so through Remix. First, connect to the destination network through MetaMask. Make sure that you are in the Injected Provider environment and that the contract is still SimpleGeneralMessage. Then take the address of the destination contract, and paste it into the At Address input. Press it, and you should be able to use the outcome contract to view the last message.

If you don’t see the result of the message, Hyperlane has an explorerGo to page [object Object] to track transactions, which you can use to track the status of the cross-chain message with the transaction hash of the first origin chain message.

Learn More About Connected Contracts
Moonbeam’s vision for an interoperable hub of networks doesn’t stop here. Learn more about on the Hyperlane websiteGo to page [object Object], including how to send cross-chain messages in the Hyperlane docs.Go to page [object Object] Read how connected contractsGo to page [object Object] have positioned Moonbeam as the leader in blockchain interoperability.
If you are interested in MoonbeamGo to page [object Object] and want to learn more, subscribe to the newsletterGo to page [object Object] and follow us on socials (links in the page header).