


Axelar’s general message passingGo to page https://docs.axelar.dev/dev/general-message-passing/overview (GMP) allows smart contracts to communicate securely across chains. This enables developers to build cross-chain connected applicationsGo to page https://moonbeam.network/builders/connected-contracts/ on Moonbeam that can tap into functionality from Polkadot, Ethereum, Avalanche, Cosmos, and beyond. In this blog, I’ll introduce the JavaScript SDK package that Axelar packed with tools to aid developers in this cross-chain vision.
Axelar SDK allows developers to estimate fees, track and recover transactions, and easily transfer tokens. To show off some of the tools that the SDK provides, we will walk through a demo that deploys an NFT that can be minted across chains. But before we begin, check out our recent blog post for an introduction to cross-chain messaging using Axelar.Go to page https://moonbeam.network/blog/connected-contracts-axelar/
Intro to Axelar Contracts
Axelar is a blockchain that connects blockchains, delivering secure cross-chain communication. Every validator in Axelar’s network runs light nodes on chains that Axelar supports. This dynamic validator set achieves consensus to confirm that messages are being sent from one chain to another by monitoring each chain’s Axelar gateway contract, which is one of the two Axelar contracts we will be interacting with later in the demo.
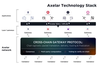
Image from Axelar NetworkGo to page https://www.axelar.network/blog/an-introduction-to-the-axelar-network
The other contract we will be working with is the Axelar Gas Receiver microservice. Whenever you use the Axelar gateway to send a cross-chain transaction, IAxelarGasReceiver lets you pay for the subsequent transaction on the destination chain. While not necessary, it allows the end user to only send one transaction to automatically update the destination chain, and to pay all transaction fees in the source-chain token they already hold.
The CrossChainNFT Contract
I’ve written a simple contractGo to page https://github.com/jboetticher/axelar-sdk-demo/blob/main/contracts/CrossChainNFT.sol that can only mint an NFT if it receives a specific cross-chain message.
Minting the NFT will require a token payment, which will be wrapped DEV (Moonbase Alpha’s native currency). A wrapped token for a native currency like DEV will mint one ERC-20 WDEV token for every one DEV sent to it, and gives the option to redeem one WDEV token for one DEV. Using WDEV instead of native DEV is required because Axelar requires all tokens sent to be ERC-20s.
So to mint in the cross-chain message, it must receive at least 0.05 WDEV.
We’re putting the same contract on two chains, so it has to both send and receive messages. From a high level, our contract does two things:
- Send an encoded address message with WDEV across chains via Axelar’s gateway with the option to pay for its gas on the destination chain
- Receive an encoded address message from Axelar, and execute only if it received at least 0.05 WDEV
You’ll be using a Hardhat project instead of using Remix, but before we set up let’s first take a look at a few parts of the contract. I encourage you to follow along!
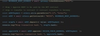
Contracts that can be executed by the Axelar gateway, like ours here, inherit from IAxelarExecutableGo to page https://github.com/axelarnetwork/axelar-cgp-solidity/blob/main/contracts/interfaces/IAxelarExecutable.sol. This parent contract has two overridable functions, _execute and _executeWithToken, that allow developers to change the logic when a contract receives a contract call from the Axelar gateway. Both functions have the same inputs, but _executeWithToken also includes tokenSymbol and amount to describe the token being sent cross-chain.
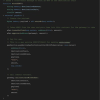
Now let’s finally take a look at our mint function. It takes three inputs: a destination address, a destination chain, and the amount of WDEV to send. Remember that this mint function is called on the origin chain (Moonbase Alpha), and causes an NFT to be minted on a different destination chain.
The logic itself has three steps. First, it takes WDEV from the caller. The caller will have to approve our NFT contract to transfer their WDEV beforehand. Then our NFT contract approves the gateway to transfer the WDEV that it takes from the caller since the gateway contract will try to transfer the tokens from our NFT contract in the final step.
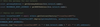
Next, to pay for gas on the destination chain, we make use of the IAxelarGasServiceGo to page https://github.com/axelarnetwork/axelar-cgp-solidity/blob/main/contracts/interfaces/IAxelarGasService.sol contract. This contract has many different configurations to pay for gasGo to page https://docs.axelar.dev/dev/gas-services/pay-gas#alternative-gas-payment-methods-for-callcontract, like paying for execute versus executeWithToken or using an ERC-20 token as payment versus using native currency. Be careful if you plan on writing your own contract later!
In this case, since the origin chain is Moonbase Alpha, the native currency is DEV. We can use native DEV to pay for gas on the destination chain, based on the conversion rates between Moonbase Alpha’s native currency and the destination chain’s native currency. Since we’re sending a contract call that includes a token and plan on paying for destination gas in DEV, we will be using the payNativeGasForContractCallWithToken function.
Finally, we call the gateway to send our cross-chain message with callContractWithToken. Notice that the payload (generic data that can be sent in a cross-chain call) that we’re sending is just the caller’s address. This data will need to be decoded by the destination contract.
Now let’s take a look at what happens on the destination chain.
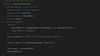
Since we’re expecting tokens to be sent as payment for an NFT mint, we will override _executeWithToken from IAxelarExecutable.
In our implementation of _executeWithToken, we first check to make sure that the tokenSymbol provided by Axelar is “WDEV”. Then we expect 0.05 WDEV tokens for payment, and will revert if any other token or anything less than 0.05 WDEV gets sent. Afterwards we decode the payload to get the address of the origin chain’s caller so that we can mint an NFT to that address. Finally, we finish the minting!
Setting Up the Repository
I’ve set up a Github repositoryGo to page https://github.com/jboetticher/axelar-sdk-demo specifically for this blog post. Be sure to clone it!
To set up all of the dependencies, run the following command in the cloned folder:
“`
npm install
“`
Most notably, we’re installing Hardhat, OpenZeppelin contracts, some Axelar contracts, and the Axelar SDK.
The repository contains two solidity files. The first file is the CrossChainNFT as expected, and the second is an Axelar library StringAddressUtils.sol that doesn’t have an npm package yet, but is still required for the Hardhat implementation.
There are also four Hardhat scripts within the repository’s scripts folder.
- axelarStatus.js: a Hardhat task that lets you view information about Axelar transactions
- deploy.js: deploys the CrossChainNFT to the network provided by Hardhat
- gatewayGasReceiver.js: returns hardcoded values for Axelar’s gateway and gas service contracts
- mint.js: mints the CrossChainNFT (only run on Moonbase Alpha)
Before we get into the juicy part, you will need to get an account with a private key funded with DEVGo to page https://docs.moonbeam.network/builders/get-started/networks/moonbase/#get-tokens to deploy the contract and sign all future transactions. Place this within a secrets.json file within the repository’s main directory. It should be formatted like so:
“`
{
“privateKey”: “YOUR_PRIVATE_KEY”
}
“`
If everything goes well, you will be able to compile correctly:
“`
npx hardhat compile
“`
Deploying a Cross-Chain Contract on Moonbeam
This demo focuses on using the scripts, so it’s best to take a look at them, starting with deploy.js, which is similar to example Ethers.js deployment contracts.
gatewayGasReceiver.js stores many of the contract addresses in this repo, which are necessary for the deployment. You likely will not have to change any of the hardcoded addresses.
Try deploying your contract to the origin chain:
“`
npx hardhat run scripts/deploy.js –network moonbase
“`
You should see the address deployed and printed in the console. Be sure to copy it! You will need it for interacting with the next script.
You also need to deploy it to the destination chain. The choice of which destination network to use is up to you, but you will need its native currency to deploy. I’ve included some of the available networks and their faucets here:
Network | Deployment Command |
Ropsten TestnetGo to https://faucet.egorfine.com/ page to Ropsten Testnet | npx hardhat run scripts/deploy.js –network ropsten |
Polygon MumbaiGo to https://faucet.polygon.technology/ page to Polygon Mumbai | npx hardhat run scripts/deploy.js –network mumbai |
Avalanche FujiGo to https://core.app/tools/testnet-faucet page to Avalanche Fuji | npx hardhat run scripts/deploy.js –network fuji |
Fantom TestnetGo to https://faucet.fantom.network/ page to Fantom Testnet | npx hardhat run scripts/deploy.js –network fantom |
Be sure to copy the destination chain’s contract also!
Looking at the Mint Script
The minting contract is more exciting, and will require Axelar’s SDK.
At the top of the script, Ethers.js is initialized in a Hardhat script. The Axelar SDK is also initialized. There are multiple Axelar APIs available in the SDK, but in this case we will only be using the AxelarQueryAPI sinceit includes all of the gas estimation functionality that we’ll need for paying gas fees across chains.

There are also some constants for you to change right after. This walkthrough is using Fantom as the destination chain, but you can use whichever chains you deployed to. Note that even though we’re using a testnet environment, the chain names are still their mainnet equivalents, hence why the origin chain is “MOONBEAM” and not “MOONBASE”.

Next, we have to work with wrapped DEV to send across chains. First, we must wrap our DEV and then we approve the contract on the origin chain to take some of our WDEV. This is necessary because the origin chain’s contract has to send your WDEV to pay for minting the NFT on the destination chain.
Note here that instead of hardcoding the WDEV contract address, we’re using the IAxelarGateway contract to find the address. We could have also done this in the smart contract itself, but I wanted to show off how you would do it with Ethers.js.
As expected, we sign two transactions: first to wrap 0.13 WDEV, then to approve our CrossChainNFT contract to send that WDEV.
You may be wondering why we’re wrapping 0.13 WDEV when the price of the mint is only 0.05. At time of writing, Axelar collects a small fee (0.08 WDEV in this case) when transferring tokens between networks, which can be calculated on their websiteGo to page https://docs.axelar.dev/resources/contract-addresses/testnet#cross-chain-relayer-gas-fee. This is done automatically by the gateways, but this responsibility may be delegated to theIAxelarGasService contract in the future.
Now we have to estimate the amount of DEV that we send to the mintXCNFT function to pay for gas on the destination chain. This is where the Axelar SDK kicks in.
We must estimate the amount of gas to spend on the destination chain, because it is difficult to estimate a function that can only be called by a specific contract. In this case, we overestimate the amount of gas we will spend as 400,000. In an actual production environment, you may want to benchmark the amount of gas that you spend. However, if you do end up overestimating by a lot, you will get refunded by Axelar’s gas services.
The estimateGasFee function provided by the Axelar SDK will find the conversion between the origin chain’s native currency and the destination chain’s native currency to find the right amount to send to the destination chain.
You, the astute reader, might wonder why we’re using “GLMR” instead of “DEV”. Similar to how Axelar uses the mainnet chain names instead of using the testnet names, Axelar will interpret “GLMR” as “DEV” since we’re using the testnet environment.
Calling this function from the SDK will return a string that represents the amount of DEV WEI to pay, like “241760932800000”. That’s hard for us simple humans to understand, so we use Ethers.js to convert it into a more human-readable version to print to the console later.

Finally, we call the mintXCNFT contract function. The important takeaway here is that we’re sending the gasFee not as a gas limit, but as value. Ethers.js can calculate how much gas to send on the origin chain, but to pay for the destination chain, we have to calculate with the Axelar SDK and send it as value to the IAxelarGasReceiver contract.

That’s the entire script! Before we run the script, check again to make sure that the four constants (ORIGIN_CHAIN, DESTINATION_CHAIN, ORIGIN_CHAIN_ADDRESS, DESTINATION_CHAIN_ADDRESS) at the top of the script are set correctly.
Here’s the command to mint your NFT!
“`
npx hardhat run scripts/mint.js –network moonbase
“`
The console should output something similar to this:
“`
Wrap transaction hash: 0x3ddb9d8334444dffb3a16ca2ddd61f5f32b12ce0df5cdc916b7465f6b67f22b8
Approve transaction hash: 0x5b05e781aa8c4aafe12f62a61b5f99b010cf70caf0f6ce0912c640348bde11ad
Awaiting transaction confirmations…
Cross-Chain Gas Fee: 241760932800000 Wei / 0.0002417609328 Ether
Minting transaction hash: 0x148031bce691b0025928b5e5f911a82fd27f224d7d14cd3f428381553d2bb2c1
“`
The most important data here is the minting transaction because that’s how you track the status of your transaction. So don’t lose it! But if you do, you can look at all of the recent transactions on Axelar’s testnet scanner.
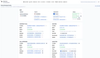
Viewing Axelar Transaction Status
Axelar has a testnet explorerGo to page https://testnet.axelarscan.io/gmp/search, and a successful transaction for the interaction you just completed would look something like this:
But it would be good practice to try to use the SDK to view the status of your transactions because it gives more information about your transaction and any possible errors. To do this, I wrote a Hardhat task for us to use. You can view the code in axelarStatus.js, but we’ll take a dive here too.
The main meat of the code is in these 5 lines. First, we initialize the SDK module that we will be using, the AxelarGMPRecoveryAPI. Unlike the AxelarQueryAPI that we used in the minting script, the AxelarGMPRecoveryAPI helps track and recover stalled transactions.
All we have to do next is query for the transaction status and the SDK takes care of it for us.

You can learn a bit more about the AxelarGMPRecoveryAPI in Axelar’s documentationGo to page https://docs.axelar.dev/dev/axelarjs-sdk/tx-status-query-recovery. It includes additional functionality in case a transaction goes wrong, especially if there isn’t enough gas sent along with the cross-chain transaction.
To run the script, run the following command, where “YOUR_TRANSACTION_HASH” is the transaction of hash on the origin chain that you sent a cross-chain message in:
“`
npx hardhat axelarStatus –tx YOUR_TRANSACTION_HASH
“`
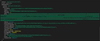
If you run the Hardhat script, you’ll end up with something like this in your console (I didn’t include all of it since it’s so large). You’re likely most interested in the status, where a list of possible ones is in Axelar’s documentationGo to page https://docs.axelar.dev/dev/axelarjs-sdk/tx-status-query-recovery#query-transaction-status-by-txhash. You’re looking for destination_executed to indicate that it was received and executed correctly, but if you’re too early you might find source_gateway_called or destination_gateway_approved.
You can learn more about debugging contracts in Axelar’s documentationGo to page https://docs.axelar.dev/dev/general-message-passing/debug/error-debugging, where they go into depth on specific error messages and how to use tools like Tenderly for logic errors.
Learn More About Connected Contracts
You’re well on your way to creating your own connected contracts with Axelar! Learn more about Axelar on their docs siteGo to page https://docs.axelar.dev/, and read about how Moonbeam is shaping up to be the leader in blockchain interoperability in our introduction to connected contractsGo to page https://moonbeam.network/blog/cross-chain-smart-contracts/.
If you are interested in MoonbeamGo to page https://moonbeam.network/ and want to learn more, subscribe to our newsletterGo to page https://moonbeam.network/newsletter/ and follow us on social (links in the page header).